First,
- Open Vancouver.tif
- Go to Channels,press Ctrl+Click to Load Selection
- Go to layer and create a new layer
- Press Alt+Del to fill the color (black)

Then, drag the "twenty" dollar image. Copy it by pressing Alt+Move.

Click the 'saving' channel so it is easier for the arrangement.
Once the dollars are arranged, make sure the 'saving' layer is below the dollars. Then, press Alt and move the cursor between both layers and click to Mask them.

Apply the same step for other layers.
Step 2
Click the Magic Wand Tool, select the word "Vacation". Go to Channels and create a new channel. Press Alt + Del to fill in the color (white).
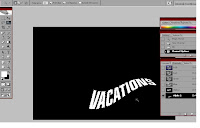
Then, drag the beach image and repeat the same step in Step 1 to Mask the images.

This is the result for "Vacation"
Step 3
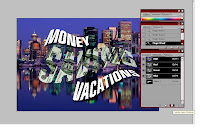
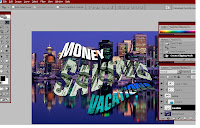
The final step is to fill the "Money" word with green color. Use the Magic Wand Tool and repeat Step 2. Before pressing Alt+ Del to fill the color,make sure the color selected is green.

This is the final result of Tutorial 3

Step 2
Click the Magic Wand Tool, select the word "Vacation". Go to Channels and create a new channel. Press Alt + Del to fill in the color (white).


Then, drag the beach image and repeat the same step in Step 1 to Mask the images.


This is the result for "Vacation"
Step 3
The final step is to fill the "Money" word with green color. Use the Magic Wand Tool and repeat Step 2. Before pressing Alt+ Del to fill the color,make sure the color selected is green.

This is the final result of Tutorial 3

No comments:
Post a Comment